Facebook Login Quick Start – iOS Swift 3 and Xcode 8

Here is yet another entry in my iOS developer journey in which I try to improve upon available official documentation.

Facebook’s login SDK for iOS has been around for a while and has gone through several iterations/updates. There are various tutorials online which have these issues among others:

  • Official Facebook Login SDK for Swift docs do not go over required Info.plist and AppDelegate.swift changes for their SDK to work, and appears to use old Swift 2 syntax.
  • Various online tutorials are still using no longer necessary objective-C bridging headers.
  • Facebook’s developer quick start for iOS steps only use objective-C syntax.

So as with Parse, I will combine the steps for doing a quick and easy Facebook Login setup in Swift 3.

Quick Start

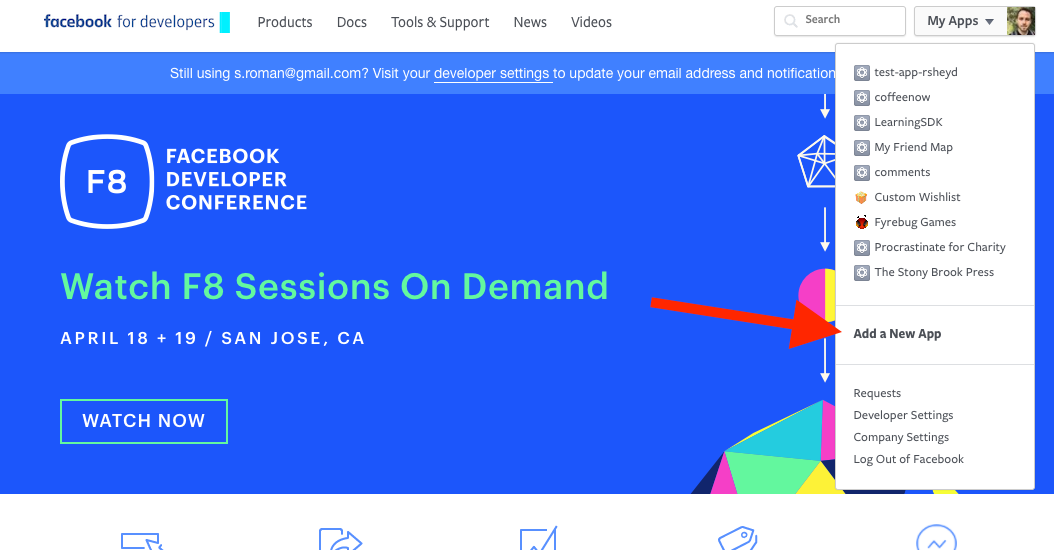
  1. Create new app at https://developers.facebook.com. This is straight-forward and simply requires a unique display name.
  2. Install Facebook libraries using cocoapods. You can do this using carthage or manually, but so far I’ve found cocoapods to be the most ubiquitous and easy way. If you haven’t used Cocoapods before, my previous post on using Parse has some additional information.
    target 'XCODE-PROJECT-NAME' do
      use_frameworks!
    
      pod 'FacebookCore'
      pod 'FacebookLogin'
      pod 'FacebookShare'
    end
    
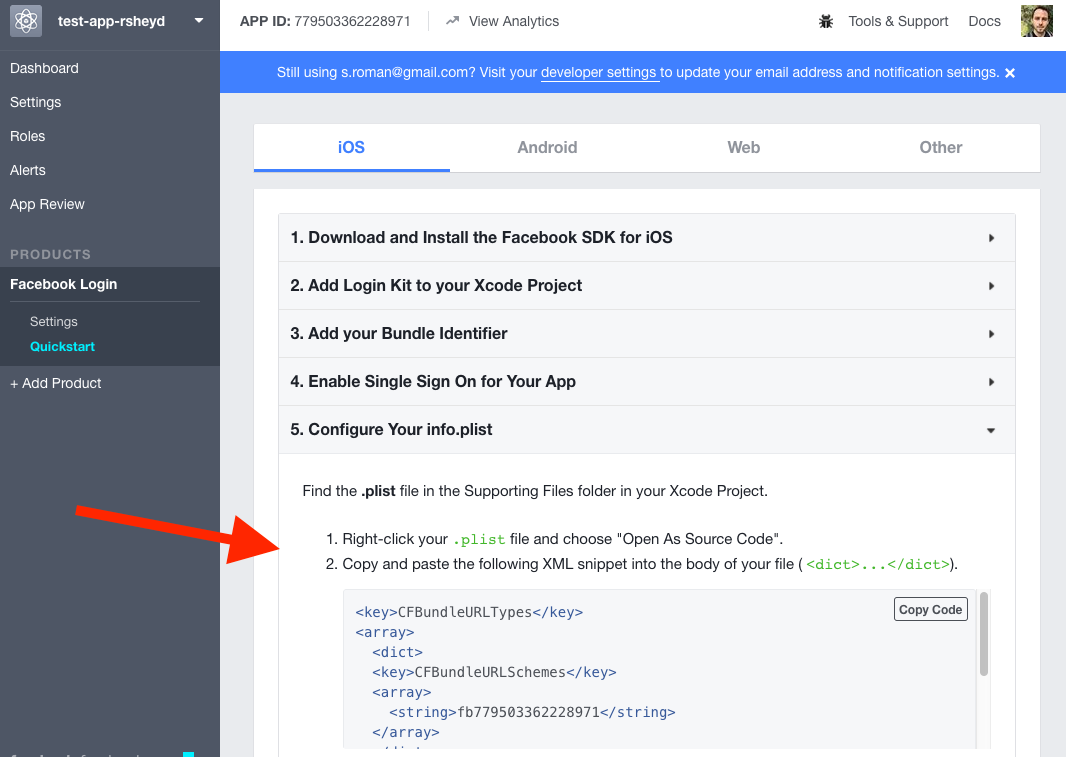
  3. Go to your new facebook app’s dashboard on https://developers.facebook.com and use “Quick Start” button under Facebook Login section to set your bundle identifier and to get the required code for your project’s Info.plist file. You can ignore/skip all the steps except 3 and 5. Make sure you get both sections for your Info.plist file in step 5.
  4. Add AppDelegate.swift methods that enable Facebook to leave and return to your app when your users try to sign in with Facebook.
    import FacebookCore
    
    func application(_ application: UIApplication, didFinishLaunchingWithOptions launchOptions: [UIApplicationLaunchOptionsKey: Any]?) -> Bool {
            // Override point for customization after application launch.
            SDKApplicationDelegate.shared.application(application, didFinishLaunchingWithOptions: launchOptions)
            return true
        }
        
    func application(_ app: UIApplication, open url: URL, options: [UIApplicationOpenURLOptionsKey : Any] = [:]) -> Bool {
            let handled = SDKApplicationDelegate.shared.application(app, open: url, options: options)
            return handled
        }
    
  5. Finally add the code for creating a facebook login button in your app.
    import FacebookLogin
    
    class ViewController: UIViewController {
    
        override func viewDidLoad() {
            super.viewDidLoad()
            // Do any additional setup after loading the view, typically from a nib.
    
                let loginButton = LoginButton(readPermissions: [ .publicProfile ])
                loginButton.center = view.center
                view.addSubview(loginButton)
        }
    }

You should now have an access token with public profile permissions for the user account that signed in with the facebook login button.

Notes/Errors

  • You may get the error: “OSStatus error -10814″. Don’t worry, this just means the facebook app isn’t installed in your simulator or on your device. Facebook Login API will still work.
  • [Update September 27, 2017] You might notice 3 errors (“contentDescription” etc) in your xcode project resulting from the facebook cocoapods. There’s an existing issue thread about these due to deprecated code, and it might very well be fixed by the time you’re reading this tutorial. The fix is easy, as you can simply comment out the lines that result in the errors.

Parse Quick Start for iOS Swift 3 and Xcode 8

So now that you set up a free Parse server on Heroku using my previous guide you might be wondering how to start using it in your iOS project. Checking the main Parse documentation shows a bunch of Objective-C, which isn’t helpful if you’re using Swift 3.

Here are the steps I gathered from perusing the web and some testing:

  1. Install Parse libraries (SDK/Framework).
    1. I prefer cocoapods to maintain to a single standard and since so many other frameworks use it.
    2. Create ‘Podfile‘ file in the xcode project folder with the following contents:
      source 'https://github.com/CocoaPods/Specs.git'
      platform :ios, '10.0'
      use_frameworks!
      
      target 'PROJECT_NAME' do
        pod 'Parse'
      end
    3. Run ‘pod install‘ in terminal in the same directory as the Podfile.
  2. Connect your Swift 3 app to Parse server.
    1. Import Parse framework by adding ‘import Parse‘ at the top of ‘AppDelegate.swift‘ file.
    2. In ‘AppDelegate.swift‘ under function ‘application(… didFinishLaunchingWithOptions …)‘ add the following code:
      let configuration = ParseClientConfiguration {
      	$0.applicationId = "YOUR_PARSE_APP_ID"
      	$0.clientKey = "YOUR_PARSE_CLIENT_KEY"
      	$0.server = "https://PARSE_SERVER_NAME.herokuapp.com/parse"
      }
      
      Parse.initialize(with: configuration)
      
  3. Test Parse server connection.
    1. Import Parse framework by adding ‘import Parse‘ at the top of ‘ViewController.swift‘ file.
    2. In ‘ViewController.swift‘ file, add the following code under function ‘ViewDidLoad‘:
      let testObj = PFObject(className: "testObj")
      testObj["foo"] = "bar"
      testObj.saveInBackground()
    3. You should see the new object in your Parse Dashboard.

Notes/Troubleshooting

If XCode can’t find the Parse module with the import command after you open the new .xcworkspace file, try the following:

  • Press Command+Option+Shift+K and then Run your app.
  • Or from the menu -> Product, press Option on your keyboard and you’ll see Clean Build Folder.

Free Parse Server on Heroku

Parse Server is a great platform for managing logins and storing data used by your apps in the cloud.

You can install and use parse server on many different cloud hosting providers, but setting up Parse Server on Heroku is one of the few ways you can try out and use it for free.

Additionally you can also install Parse Dashboard on Heroku for managing and viewing data on your Parse Server using a nice GUI.

Sources:

Install Parse Server on Heroku (easy)

  1. Use Heroku’s helpful “deploy to Heroku” link for Parse: https://heroku.com/deploy?template=https://github.com/ParsePlatform/parse-server-example
  2. Type in a unique app name. You will need this in a bit. screen-shot-2016-11-04-at-10-28-34-am
  3. For config variables, change APP_ID and MASTER_KEY to your own unique values. For SERVER_URL change “yourappname” to whatever you picked for your App Name. screen-shot-2016-11-04-at-10-29-51-am
  4. Click the big Deploy button. A helpful build process will be displayed and your parse server should be ready to go in about 1 minute.

At this point you can start using your Parse Server with its standard SDKs and REST interface.

If you had any issues with the automated deployment, you can also use the manual process in the Heroku devcenter source link above. The only thing you will need to do is make sure you set the Master_Key and App_ID by going to your Config Variables under your Heroku app’s Settings tab, and adding “MASTER_KEY” and “APP_ID” variables.

Install Parse Dashboard on Heroku

  1. Install Node.js, Git and the Heroku Toolbelt on your machine.
  2. Run the following commands in your terminal/command line app. You can use whatever options you want for ‘npm init’.
    mkdir my-parse-dashboard
    cd my-parse-dashboard
    git init
    npm init
    npm install --save parse-dashboard

    This will create a git repository for the parse-dashboard code and download the required code.

  3. In my-parse-dashboard directory, create 2 text files (parse-dashboard-config.json and Procfile) to hold configuration data for Parse Dashboard.
    {
      "apps": [
        {
          "serverURL": "https://parse-server38.herokuapp.com/parse",
          "appId": "parseServer38",
          "masterKey": "secretMasterKeySK$%@F09292",
          "appName": "My Parse Server App"
        }
      ],
      "users": [
        {
          "user":"user1",
          "pass":"securePass281"
        }
      ]
    }


    web: ./node_modules/.bin/parse-dashboard --config ./parse-dashboard-config.json --allowInsecureHTTP


  4. Commit all files to your git repository.
    git add package.json Procfile parse-dashboard-config.json
    git commit -m "Initial Commit"


  5. Push repository to Heroku.
    heroku login 
    heroku create
    git push heroku master


  6. Deploy app in free tier and open it.
    heroku ps:scale web=1
    heroku open


  7. Use the username and password from the config file to login to Parse Dashboard.

You should now be able to use a GUI to view and manage your Parse Server.

Notes and Potential Errors

  • Parse Dashboard: Application suffered an error. Check Logs.
    • Use heroku logs command in terminal to view logs.
    • This happened to me due to an error in parse-dashboard-config.json. Make sure all fields match what you configured when setting up Parse Server heroku app and look up syntax for further reference.
  • Parse Dashboard: “Server not available” for Parse Server App.
    • Occurred when I put in HTTP instead of HTTPS in the serverURL field in parse-dashboard-config.json.
  • Use the following commands after making changes in parse-dashboard-config.json.
    git add parse-dashboard-config.json
    git commit -m "updated blah blah"
    git push heroku master


Google Maps SDK and APIs using Swift 3 / Xcode 8

While trying out the Google Maps SDK on iOS and Google Maps Directions API I noticed that Google’s Getting Started code hasn’t been updated for Swift 3. Here are the changes required to get the code to work.

Google Maps SDK

  1. Follow first 3 steps (install latest xcode, install sdk, get api key) at https://developers.google.com/maps/documentation/ios-sdk/start.
  2. Create a single view application in Xcode. For viewDidLoad() function in ViewController.swift, add the following code. Note: I decided to include the API key under viewDidLoad() for simplicity.
    GMSServices.provideAPIKey("YOUR_API_KEY")
    
    let camera = GMSCameraPosition.camera(withLatitude: -33.868,
          longitude:151.2086, zoom:6)
    let mapView = GMSMapView.map(withFrame: CGRect.zero, camera:camera)
    let marker = GMSMarker()
    
    marker.position = camera.target
    marker.snippet = "Hello World"
    marker.appearAnimation = kGMSMarkerAnimationPop
    marker.map = mapView
    
    self.view = mapView
  3. Run the app. You should see a map with a single marker centered over Sydney, Australia. If you click on the marker, you should see the text “Hello World” above it. If you see the marker, but the map is not visible, confirm that you have provided your API key.

screen-shot-2016-10-14-at-12-28-09-pm

Google Maps Directions API

I decided to use Alamofire iOS library to make HTTP requests to the Google Maps Directions API as it makes it much easier than the built-in Swift methods.

  1. Use Alamofire installation instructions here: https://github.com/Alamofire/Alamofire. I went with the CocoaPods method as it was what Google Maps SDK used and it worked well for me.
  2. Get an API key for Google Maps Directions API here: https://developers.google.com/maps/documentation/directions/ (about halfway down the page).
  3. Create a single view application in Xcode. For viewDidLoad() function in ViewController.swift, add the following code.
    Alamofire.request("https://maps.googleapis.com/maps/api/directions/json?" +
                "origin=Disneyland&destination=Universal+Studios+Hollywood4&" +
                "key=YOUR_API_KEY").responseJSON
                { response in
                    print(response.request)  // original URL request
                    print(response.response) // HTTP URL response
                    print(response.data)     // server data
                    print(response.result)   // result of response serialization
                    
                    if let JSON = response.result.value {
                        print("JSON: (JSON)")
                    }
            }
  4. Run the app. You should see the waypoints and directions in the Xcode Console.

screen-shot-2016-10-14-at-12-28-26-pm

Climbing Mount Elbert

A couple of weeks ago I went to Colorado with the goal of climbing Mount Elbert. At 14,440 feet high it is the tallest mountain in Colorado.

Unfortunately I only made it to about 13,650 feet =). A combination of lack of time and mild altitude sickness (on my part) prevented my brother and I from reaching the summit. However I did get some great photos and fully intend on reaching the summit on my next attempt, whenever that is.

Video correction: 2nd tallest mountain outside of Hawaii/Alaska =).

Set up L2TP/IPSec PSK on Surface RT

Surface RT stock imageAt this time, Microsoft’s Surface RT has a very limited GUI for editing VPN parameters. For example, there’s no input field for a pre-shared key commonly used with L2TP/IPSec VPN type. Since there’s limited information for setting up more advanced VPN connections on Surface RT, I figured I would post these simple steps.

  1. Use Windows 8 powershell vpn cmdlet: http://technet.microsoft.com/en-us/library/jj613766.aspx
  2. Open up Powershell
  3. Example:Add-VpnConnection –Name “My VPN” –ServerAddress vpn.mydomain.com –TunnelType L2tp –L2tpPsk 5E2BBC9D423B50A2 –RememberCredential 1 –SplitTunneling 1

S Symbol in Your Emails

I recently ran into an issue where the š character appeared in a client’s emails that weren’t there when she sent them. This was apparently caused by Outlook 2011’s autoformatting options that replaced … with a special ellipses character, which wasn’t supported in all mail clients.

Here’s how you can disable that feature and thus avoid unintentional symbols in your emails.

1. Open Outlook and go to Outlook preferences.

Screen Shot 2013-11-06 at 10.41.31 AM

2. Select AutoCorrect under the Personal Settings category.

3. Select AutoFormat tab and uncheck “…” with ellipses.

Screen Shot 2013-11-06 at 10.43.42 AM

Pesky RunDLL Virus Errors at Logon

One of our user’s computers was infected with a virus that, after being removed and cleaned up, left these annoying RunDLL errors for DLL files with randomly generated filenames which occurred every time the user would login:

logon errors

I didn’t get far trying to google some keywords related to the errors. However, some results did point me in the right direction for resolving the issue.

Basically, you want to check every possible repository of startup items or commands. In the registry, most google results told me to check the following locations.

  • HKEY_LOCAL_MACHINE/SOFTWARE/Microsoft/Windows/CurrentVersion/Run
  • HKEY_CURRENT_USER/SOFTWARE/Microsoft/Windows/CurrentVersion/Run

However, where these virus-caused items actually ended up being was under a specific user profile in HKEY_USERS:

HKEY_USERS/userprofile/SOFTWARE/Microsoft/Windows/CurrentVersion/Run

I should mention that CCleaner did not list them under the startup category and neither did msconfig, so registry might be the only way to find them that I know of.

A 23-year-old Learns About Retirement Accounts (and their tax benefits)

So I didn’t really know about this, but apparently opening a retirement account and putting money into it instead of savings is a really nice way to get higher tax return (or owe less taxes) and a much better interest rate as well.

Contributions to traditional IRA still count for the previous tax year if you make them before April 15.

You can quickly see how much of a difference it would make by using this tax estimator (under the retirement button): http://turbotax.intuit.com/tax-tools/calculators/taxcaster/

So basically you can open an IRA (I did through betterment.com cause it’s cheap and quick), move some money from savings, and put the retirement contribution on your tax return.

The only drawback is you cant withdraw it without a 10% penalty until you’re 59 years old, unless it’s for education, buying/building first home, or medical expenses – which are some of the primary uses of my savings anyway.